Photo by Leonardo Toshiro Okubo on Unsplash
Localize your Flutter packages
With a summary of localization in Flutter
Flutter's basic blocks are reusable widgets. You create a widget and you can use it everywhere in your application.
But what happens when you have multiple applications and you want to use the same widgets? You can create a Flutter package, which can be shared amongst your project and with everyone else by publishing it on pub.dev.
When you develop your app to support multiple locales, your Flutter package should support that as well. Let's see how it works with the built-in solutions using the flutter_localizations and intl packages.
Basically, you can follow the great tutorial on flutter.dev about the localization of an application. We need to do the same with minor differences.
Prepare the package
First, let's create our Flutter package with
flutter create --template=package my_awesome_widgets
Let's add the required dependencies to pubspec.yaml
dependencies:
  flutter:
    sdk: flutter
  flutter_localizations:
    sdk: flutter
  intl: ^0.17.0
With the help of flutter_localizations and intl packages, Flutter can generate the localization classes based on your strings and translations. But we need to enable the code generation by extending the Flutter specific part in the pubspec.yaml file:
flutter:
  generate: true
Configure the code generation
The next step is to create the configuration file for the localization. It's name is l10n.yaml and it should be at the root of your Flutter project.
# This is the home of your localization files.
arb-dir: lib/l10n
# The name of the file where you define your translatable strings
template-arb-file: my_awesome_widgets_en.arb
# Your generated code will be placed to this directory
output-dir: lib/l10n/generated
# The name of the generated class
output-class: MyAwesomeWidgetsLocalizations
# The file name for the generated code
output-localization-file: my_awesome_widgets_localizations.dart
# This tells Flutter where it should generate the code.
synthetic-package: false
# This tells the code generator to create nullable getters for our strings or not.
nullable-getter: false
The option that we will need for our package is the synthetic-package, which controls whether the generated code should go under .dart_tool or to the output directory defined in output-dir. Since we want to share our package, we will need to export it, so it should be in a place that can be added as an export statement.
Translatable strings
Let's define our translatable strings. Based on the configuration above, the base translation template is lib/l10n/my_awesome_widgets_en.arb. It is a JSON like file using the ICU format
{
  "appTitle": "My Awesome Widgets",
  "@appTitle": {
    "description": "This is the title of the application"
  }
}
All translatable string has key and optional meta information, which helps the translator and provide additional input for the code generator. We have lots of options like parameters, pluralization.
Using a placeholder
{
  "welcome": "Welcome {name}",
  "@welcome": {
    "description": "The welcome messge on the home page",
    "placeholders": {
      "name": {
        "type": "String"
      }
    }
  }
}
Pluralization
{
  "friendRequests": "{count, plural, =0{You have no new friend request} =1{You have one reuquest} other{You have {count} requests}}",
  "@friendRequests": {
    "description": "The number of pending friends requests",
    "placeholders": {
      "count": {
        "type": "int"
      }
    }
  }
}
Selection
You can define different strings based on the value of the input parameter. This could be useful for example for texts that are different for the genders in your language.
{
  "sendMessage": "{sex, select, male{Send him a message} female{Send her a message} other{Send a message}}",
  "@sendMessage": {
      "description": "Message on the send button",
      "placeholders": {
          "sex": {
            "type": "String"
          }
      }
  }
}
But the select is not restricted to only gender-based strings, you can use it for any input that requires a different string representation based on its content.
Number and date formatting
You can specify the format for numbers or dates in the arb file, so it will use the locale-specific version when it is displayed.
{
  "discountPrice": "Discount: {price}",
  "@discountPrice": {
    "placeholders": {
      "price": {
        "type": "double",
        "format": "currency"
      }
    }
  },
  "shippingDate": "Estimated shipping at {date}",
  "@shippingDate": {
    "placeholders": {
      "date": {
        "type": "DateTime",
        "format": "yMMMd"
      }
    }
  }
}
Usage
So far we have the translation strings, we can generate the classes by running:
flutter gen-l10n
Which will output the following
Because l10n.yaml exists, the options defined there will be used instead.
To use the command line arguments, delete the l10n.yaml file in the Flutter project.
This will generate the MyAwesomeWidgetsLocalizations class under lib/l10n/generated.
Let's export the class by adding the following line to lib/my_awesome_widgets.dart
export 'l10n/generated/my_awesome_widgets_localizations.dart';
Now we can use it in one of our cool widget
import 'package:flutter/material.dart';
import 'package:my_awesome_widgets/my_awesome_widgets.dart';

class CoolTexts extends StatelessWidget {
  const CoolTexts({Key? key}) : super(key: key);

  @override
  Widget build(BuildContext context) {
    return Column(
      children: [
        Text(MyAwesomeWidgetsLocalizations.of(context).appTitle),
        Text(MyAwesomeWidgetsLocalizations.of(context).welcome('John')),
        Text(MyAwesomeWidgetsLocalizations.of(context).friendRequests(0)),
        Text(MyAwesomeWidgetsLocalizations.of(context).friendRequests(1)),
        Text(MyAwesomeWidgetsLocalizations.of(context).friendRequests(2)),
        Text(MyAwesomeWidgetsLocalizations.of(context).sendMessage('male')),
        Text(MyAwesomeWidgetsLocalizations.of(context).sendMessage('female')),
        Text(
          MyAwesomeWidgetsLocalizations.of(context).sendMessage('unspecfied'),
        ),
        Text(
          MyAwesomeWidgetsLocalizations.of(context).discountPrice(20),
        ),
        Text(
          MyAwesomeWidgetsLocalizations.of(context)
              .shippingDate(DateTime.now()),
        ),
      ],
    );
  }
}
Add another locale
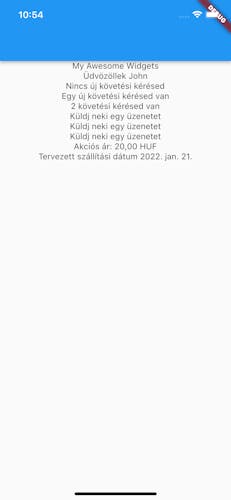
If you want to add another locale to your package, you have to create a new arb file next to the my_awesome_widgets_en.arb. For example a Hungarian translation will look like
{
  "appTitle": "My Awesome Widgets",
  "welcome": "Üdvözöllek {name}",
  "friendRequests": "{count, plural, =0{Nincs új követési kérésed} =1{Egy új követési kérésed van} other{{count} követési kérésed van}}",
  "sendMessage": "{sex, select, male{Küldj neki egy üzenetet} female{Küldj neki egy üzenetet} other{Küldj neki egy üzenetet}}",
  "discountPrice": "Akciós ár: {price}",
  "shippingDate": "Tervezett szállítási dátum {date}"
}
It is fine to have only the strings in your other locales, you don't have to repeat the meta-information.
Running flutter gen-l10n will create a class for the Hungarian translation next to the English version.
Use the package in a Flutter application
Once we have our package with the shareable widgets, we can use it as a dependency in our Flutter applications. The only thing we have to do is to add the localization delegate to our application, so the localization SDK will know how to create the `` for each locales.
import 'package:flutter/material.dart';
import 'package:flutter_localizations/flutter_localizations.dart';
import 'package:my_awesome_widgets/my_awesome_widgets.dart';

class MyAwesomeApp extends StatelessWidget {
  const MyAwesomeApp({Key? key}) : super(key: key);

  @override
  Widget build(BuildContext context) {
    return MaterialApp(
      localizationsDelegates: const [
        // Add the localization delegate of your package
        MyAwesomeWidgetsLocalizations.delegate,
        GlobalMaterialLocalizations.delegate,
        GlobalCupertinoLocalizations.delegate,
        GlobalWidgetsLocalizations.delegate,
      ],
      supportedLocales: const [
        Locale('en'),
        Locale('hu'),
      ],
      home: Scaffold(
        appBar: AppBar(),
        body: const Center(
          child: CoolTexts(),
        ),
      ),
    );
  }
}
| English | Hungarian |
 |  |
Testing the package
We want to share a reliable package that is not sensitive to changes we make by adding new features. So we add tests to our package. In order to test the widgets that use locales, you have to provide the same environment for them as they would be used in a real app. This means you have to provide a MaterialApp and the delegates as well.
import 'package:flutter/material.dart';
import 'package:flutter_test/flutter_test.dart';

import 'package:my_awesome_widgets/my_awesome_widgets.dart';

void main() {
  group('CoolTexts', () {
    testWidgets('displays the texts', (tester) async {
      await tester.pumpWidget(
        const MaterialApp(
          // Add the delegates defined by our package
          localizationsDelegates:
              MyAwesomeWidgetsLocalizations.localizationsDelegates,
          home: Scaffold(
            // Add our widget that we want to test
            body: CoolTexts(),
          ),
        ),
      );
      // Check it works correctly
      expect(find.text('Welcome John'), findsOneWidget);
    });
  });
}
Summary
This article became longer than I expected. My goal was to show how to add locales to your Flutter package and how can you use it in your applications. Feel free to leave your thoughts in the comment section.

